Showing posts with label Beauty. Show all posts

Leopard Print Nail Art Revisited

20 March 2014

Considering that painting my nails is one of my favourite pastimes, done without fail a couple of times a week, I can't believe it's been over a month since my last nail post! If it weren't for the fact I snapped a few quick photos on my iPhone of these just after completion, this could have been another forgotten manicure.

This was a revisit/upgrade of the leopard print accent nail manicure I did when I first began this blog a couple of years ago. You can see the original post, 'Leopard Print Nail Art How To', for a basic explanation of the steps to create the leopard pattern. The old post is also a great illustration of how my manicure skills have improved (in my humble opinion!) which goes to show a little practice (and some  patience) is all you need for this manicure. It's much easier than it looks, and the key to a great leopard print effect is to make sure the splodges of color are various sizes and shapes. Also, don't completely encircle the colour with black, leave spaces and do a few dots of black on it's own in a couple of places.  Random is the name of the game!

How To Tutorial OPI

Top Coat Review
Base color - Essie 'Marshmallow'  //  Leopard print - OPI 'Shorts Story' & The Face Shop 'Black Nail Art Pen' 
How To Nails

Even though I swore I hated it, I decided to give Essie 'Marshmallow' another shot, it took four coats to achieve this colour and getting it to look smooth was NOT easy. Needless to say, I still don't recommend it.

OPI on the other hand (pun just a happy accident), never seems to fail me. 'Short's Story' is a long time favourite of mine and for this manicure I used the OPI Top Coat too instead of Seche Vite. As much as I love the finish you get from Seche, the shrinkage can be pretty awful.


I'll try to do nail posts on a more regular basis, if that's something you lovelies are interested in seeing? 


Follow on Bloglovin

Making Me Smile // Hiatus Edition

9 March 2014

Apologies for the unannounced hiatus. It wasn't planned, it's just been one of those periods where something comes up, quickly followed by another thing and another. Don't you hate those times?!

I think I mentioned before, we moved apartment last month and to say that it was a smooth transition would be lying. It felt like everything that could possibly be an issue was. One of the more frustrating problems was that it took us over a week to get an Internet connection sorted out, only for it to be cut off a couple of weeks later. It's then taken us until now, with no less than around 15 phone calls (of varying levels of politeness), to get it back on again. Fantastic! For a blogger and social media addict like myself, having no Internet at home is somewhat of a problem, but apparently not one the service provided seemed to care about! Also, in what felt like the final twist of ugly fate, the Mr managed to catch Dengue Fever (a tropical illness passed on by mosquitoes) a couple of weeks ago. He was sick in bed for about a week until he was hospitalised this last week. It's shocking how extreme some of the illnesses out here actually are. Thankfully he's heaps better now and is back home but...an easy, hassle free month...errrm, no, not quite.

Anyway, they say bad things come in threes and I think we've more than exceeded that, so hopefully from here on out it's plain sailing (and blogging). I know I sound like I'm ranting but believe it or not, despite all that's been going on for the last month, I'm actually really enjoying life here in Indonesia. Between the bad there's still been a lot of good. So, in the interest of looking on the bright side of life, here's just a handful of simple things that have been making me smile;


Moving apartment - if only because it helped me re-discover this amazing Christmas gift I'd tucked away and then somehow forgotten about! I love the lipstick in particular; a cremesheen called 'How Darling!'
Brunching and chatting with new lovely girl friends...
...at PAUL. If you've ever been to one, you'll know why this makes me smile. And, if you haven't been, you really need to!
Extra sparkle on stressful days.
Enjoying icy cool drinks and good conversations in the balmy evening sun on our balcony.

I'm grateful that tomorrow is a new day and the start of a new week (with Internet). Onwards and upwards :) Have a great week everybody!

x 


Find Me On  //  YouTube  //  Twitter  //  Facebook  //  Bloglovin  //  Instagram  //  Pinterest

What's In My Bag - Wash Bag Edition

2 August 2013


The Mr and I are taking a little road trip this weekend. We’re going all the way down the country to the costal city of Busan, stopping off at another city along the way. We’re just going to be away for three nights, but no matter how short the trip I always fail to ‘pack light’, and this trip is no exception. Of course! I tried my best to keep luggage to a minimum but without the restrictions of an airline weight limit, it just turned into a ‘throw-everything-I-could-possibly-ever-need’ into a second bag....ermmm…..and then a third (small one though, I swear!).

So anyway, you’ll be seeing some pictures of the trip on here soon I’m sure and snapshots even sooner on my Instagram. But, I decided to do a quick ‘What’s In My Bag’ of sorts - the Washbag Edition let’s call it!

+ The Basics - Deodorant, razor, toothbrush, toothpaste – all pretty standard stuff but essentials for anyone, with good personal hygiene at least...
  
+ Assorted shampoo, conditioner, body wash minis - I like to collect minis from hotels I visit, I have a stockpile in my apartment. Something about the teeny versions of products make me happy, yes it's a little sad, but it's true. They’re perfect for using on future trips, and come on, who wouldn't be just a little excited about Molton Brown and Bliss products?! Both of these brands always smell amazing and are, of course, very decent quality too. 

+ Kerastase Ciment Thermique - This is a heat activated hair milk. It's designed to protect and reconstruct hair. I have very dry damaged hair as a result of years of highlights and this stuff truly does help my hair to not only feel better but also look better. It's pricey, but a little goes a long way and when it comes to trying to protect and improve your hair's condition, I think it's worth it.

+ Kerastase Elixir Ultime - I've been using this for almost two years now and although I experiment with a lot of other hair oils/masks/sprays this is by far my favourite. It's nourishing and smoothing, not to mention I love the smell. 

+ Daisy Eau So Fresh Perfume by Marc Jacobs – This is my very favourite summer scent, it’s light and floral without being overpoweringly sweet. It’s one of those smells that is very unoffensive, most people either like it, or at the very least don’t mind it. I also keep a little mini bottle in my handbag since it does need topping up through the day.

+ Ultrasun Sunscreen – This sunscreen is something I literally swear by since wearing it for a month in the Australian summer sun and never burning or even the tiniest bit pink. I know a lot of creams claim to be a ‘once-a-day’ application but in many cases they need re-applying, this one gives protection for the entire day so you can just enjoy yourself without worrying about whether your frazzling your skin. There's a variety of SPF options, I took SPF30 to Australia, but for trips when I’m not going to be laid out in the sun I take SPF20. The thing I really love is they make a glimmer formula which gives you a very subtle sparkle. And, we all know how I feel about sparkle by now.

+ Bioderma Crealine H2O - Yes, I jumped on this bandwagon several months ago and am another big fan. You've probably read enough review about this to know it's pretty much a miracle cleansing water. It removes all makeup, cleanses, improves skin tone, sings, dances, you name it, it does it. I've noticed a major improvement to my skin since using this and although the price is a little hefty, I'm not even half way through my full size bottle after over two months. 

+ Dr Jart Soothing Moisturizer – A couple of  months ago I ran out of my old fail safe (Clinique Dramatically Different) then, after forgetting to pick up a new bottle, I bought this (actually a full size one, but this diddy travel size came with it) as a temporary measure to see me through until I had time to go pick up a new bottle of Clinique. I’ve been using Dramatically Different since forever my mum bought me a bottle as a teenager and I was in that comfort zone where you’ve used something so long you never consider change. But, change has been forced upon me and you know what, I'm actually quite liking it! A full review is coming soon.

+ Estee Lauder Time Zone Night Cream - This creme is awesome, the first time I used it I could actually notice the improvement in the morning. It's very hydrating and plumps skin well, reducing the appearance of fine lines. I have this handy mini-size for when I'm travelling.

+ L'oreal Elnett Satin Hairspray - The hairspray of all hairsprays. For me no hairspray comes close to giving the same shine, hold and glossy finish without feeling and/or looking sticky. Plus, it lasts so long but you can just brush it out whenever, how do they do that? I actually almost always have a travel size can in my bag for quick fixes or a little sprucing up on the go.


Phew! That was more extensive than I intended. But if you're still reading, (let me say thank you!!) you'll be pleased to hear that is officially the end of the What's In My Bag - Wash Bag Edition.

What's in your wash bag? Any of the same products?

x x x


Follow on Bloglovin

 Find Me On  //  YouTube  //  Twitter  //  Facebook  //  Bloglovin  //  Instagram  //  Pinterest

Chanel Poudre Universelle

18 July 2013


I'd been nearing the end of my face powder for a while and wanted to try a new one. With a gift voucher threatening to burn a hole in my pocket it seemed like a trip to the Chanel makeup counter was in order to take some of the heat off. 

I've noticed this powder, Chanel Poudre Universelle Libre, around the blogsphere quite a few times and have also seen Pixiwoo using it in videos. So, I figured I'd give it a whirl myself. It was either this or another 3 nail polishes to add to my collection, which by no means needs anymore expanding! What appealed to me most about the powder, is that according to the official Chanel description it has photo-reflective pigments which help to smooth skin and 'disguise imperfections without emphasizing lines'. Let's be honest, who wouldn't that appeal to?! Anyway, since it's been around a while and no doubt a lot of you will have already read about, or even used this powder yourself, I'm going to attempt to keep this brief by breaking it down into a simple 'the good', and 'the bad'.

Let's get the BAD out of the way first:

- This is quite a chunk of Chanel. It's certainly not a dainty, lightweight little compact that you're going to slide into your handbag. This powder is probably best staying on your dressing table. The screw lid is also asking for disaster too since it's not really easy to open and close like a compact. Which leads me on to point two....

- The powder comes with a puff for applying it which I find useless since it picks up large amounts of powder and your left clumsily trying to apply it to the right areas. You could fiddle around tapping off excess powder to then lightly sweep it over your face but basically, that's a bit of a pain! I prefer to be dusted, not caked so I'm using a stippling brush instead, MAC 187, which helps with a more accurate and delicate application.

Onto the GOOD:

- Provides light coverage and sets my foundation well, giving a soft matte finish without looking cakey.

-Keeps the shine well and truly at bay, no easy task here in Korea with rainy season and crazy high humidity. I don't have oily skin, but previously (even on a normal day) I'd still feel like my t-zone could do with a little powder touch up. With this powder I haven't needed to. A lucky fact, given that I'm unwilling to cart this doorstop around with me!

- It's translucent and doesn't give me any kind of weird color (grey/yellow/orange) cast which some "translucent" powders do. It also means that even when my summer tan fades away I'll still be able to use this. 

- Price! Although it may initially seem pricey at 36 GBP or 52 USD, it's 30 grams, which is about triple the size of an average powder compact. So, do the math and you'll find it's actually cheaper than most high-end brands and only a few dollars more than some drugstore brands per gram. 30g will also last a LONG time!

- And, as for the photo-reflective pigments, I actually think it's true! Although the difference in my skin's appearance isn't profound to me, I've had several of my friends comment on how well/good I'm looking since I began using this. Coincidence? I think not. 


So, overall....it gets a thumbs up from me. Thank you Chanel, there's a new fave over here. Please just make a small compact version I can actually fit in my bag!

x x x


Follow on Bloglovin

  Find Me On  //  YouTube  //  Twitter  //  Facebook  //  Bloglovin  //  Instagram  //  Pinterest

Goodie Box Giveaway

17 March 2013

It's been a while since the last giveaway on Duckling To Swan. So, I thought I'd put together a special little giveaway for you ladies.

There's not just one item, but a whole selection of cute, fun things up for grabs. What's really special about this giveaway, is that you probably can't get your hands on the items too easily anywhere else, since they're all going to be coming to you from sunny South Korea! They're a selection of my favourite Korean beauty products with my very favourite, most worn bracelet (a new one, not my own!) thrown in for good measure. 


Here's what's included:


The Bella Bracelet  //  Not one, but two InnisFree Nail polishes - You choose the colours you want!  //  Missha M Absolute Black Mascara  //  A Tony Moly Bunny Gloss Bar - You choose what colour you want!  //  The Face Shop Make Me Glamorous Body BB Balm  //  A Pack of Hello Kitty Band Aids  //  The Face Shop Silver Glitter Polish  //  InnisFree Brightening Rice Face Mask  //  Face Shop Mini Pet Hand Cream  //  Skin Food Exfoliating Black Sugar Mask  //  The Face Shop Hyluronic Acid Face Mask

There's only ONE thing you need to do to be in with a chance of winning - Follow Duckling To Swan on Bloglovin'. Easy as that!

If you want extra entries, then you can complete the other steps listed below. The giveaway is open to everyone and finishes on the 31st of March. The winner will be announced on here. Good luck everyone!  ♥

a Rafflecopter giveaway

PS: I hope everyone's had a lovely weekend. Check out the latest instalment from my Dubai trip, HERE!  xxx

Fancy Fingers, Phones and Flights

3 May 2012


Hello Ladies, how's the week going? I'm pleased to say it's almost the weekend again. I'm already getting excited about the prospect of more lazing in the park and a bit of al fresco dining!

This week has been rather good for me. The nice weather has meant we've been able to get out and about in the evening for a couple of walks around the nearby parks. Isn't it amazing how good some warm weather and a bit of sunshine can make you feel?!

On Tuesday night I also picked up a new phone. I must have been the only person in all of Korea still using an iPhone 3. As a foreigner it's just too much of a headache to try and sort these kind of things out, so whilst my phone was still functioning I wasn't too bothered about getting a new one. Recently, it's been showing signs of dying so I decided to go upgrade. It only took me two separate visits to the shop, about 15 phone calls to a korean friend of mine and a total of around 5 hours to get an iPhone 4. Haha!

The Mr. surprised me with the cute cover when I got home. Isn't he a sweetie!

'You are wonderful and I love you' iPhone cover - Lost Dog

Another thing I've been excited about this week is my latest addition to my polish collection. Which, by the way, is growing at a shocking and slightly disturbing rate! I fear I may be developing a polish addiction. Okay, that's a lie, I know I have a polish addiction and it's been going on for a long time but I've been in denial.

Still, this new polish from Tony Moly is a dupe of Deborah Lippmann's 'Glitter In The Air' and could not be passed up. I actually ordered 'Glitter In The Air' weeks and weeks ago from an eBay seller (only way I can get it here) but it never arrived. Cue angry, also very disappointed me checking the mail box...every. single. day....TWICE. for the last five weeks. No joke!

Finally I accepted it's never coming, considered crying for a bit, then found out about this dupe available in Korea (Tony Moly is a Korean brand I think...). I headed straight to the store to get it and I'm now pretty chuffed. Can you see what I mean about an addiction going on?! It only cost $3 (versus Lippmann's $18 price tag) and from all the picture comparisons I've made it really does seem to be a near perfect match.

'Milky Way' - Tony Moly, a dupe of 'Glitter In The Air' - Deborah Lippmann and Revlon's 'Whimsical'
'Milky Way' - Tony Moly

It's a pale blue base with pink and blue glitter. It goes on quite smoothly, although it's very sheer so you do need at least three coats if you want solid coverage like my photos. The glitter builds up quite nicely if you do three coats though!

As for the actual Deborah Lippmann one I ordered...I contacted the seller and apparently they've re-shipped it to me, so we'll see if it makes it this time!

Other exciting developments over this way are that we're going to Hong Kong in just over two weeks!! We booked the tickets last night for a four day trip. I've always wanted to visit Hong Kong so I'm really, really excited about it!


Does anyone have any recommendations for places to stay/things to see/restaurants to eat in etc? I'd love to hear them if you do! 

xxx


Valentine's Day The Single Way: Nail Art and Outfit Staples

13 February 2012

Whilst I'm not single, tomorrow I'll still be spending my Valentine's Day alone. Unfortunately my fiancee is thousands of miles away working in Australia and although I'd love nothing more than to spend the day with him tomorrow I'm not going to let that turn me into a Valentine's Day Scrooge.

Yes, I know it's just a big commercial marketing ploy really but I can't help getting sucked in to the lovie dovie-ness of the day. Perhaps it's all the red and pink?! Whatever it is, I love this day despite the bad press it sometimes gets. Of course the first Valentine related thing I did was send a gift and card to my lovely other half. Then in the spirit of things I attempted to make some Red Velvet cupcakes....which turned out...brown. Fail.

Not satisfied with my poor attempt at themed baking I set about doing these Valentine's themed nails. In my opinion there's only one colour for your nails on February 14th. As if I need to tell you what that is.....!!
China Glaze - 'Ruby Pumps' & OPI - 'Top Coat'
 

Best of High Street Beauty

5 February 2012

I'm a big believer that you should spend the most money on the things you wear the most. Following this logic, I think that it's really important to invest in good quality hair and skin products. After all, your hair, skin and face are things you 'wear' every day!

So, I usually buy my hair products from my hair salon and I opt for premium brands such as MAC, Clinique and Estee Lauder for my makeup and skincare. There are a few high street items that I haven't found better alternatives for though and I consider 'must haves' in my beauty regime. 

As my time in England is drawing to a close I decided to stock up on them as they can't be bought in Korea. I tell you, the logistics of trying to look good whilst living in a foreign country can be challenging! Just understanding what the product is can be tough let alone finding what you actually want! Fake tan in Korea....errrm...no chance!


I picked up a Barry M nail polish as I haven't tried any of them before. I'll post some pics of it on my nails when I've tried it. I also got two kohl eye pencils to try out, didn't need them, I was just curious as to how good they were. The rest of the things are my high-street must buys! None of them are groundbreaking but I've spent more money and had poorer results with similar products from the high-end brands.

Get This Party Started - Deborah Lippmann Nail Polish

14 January 2012


If you read my blog regularly you might remember I mentioned Deborah Lippmann's Get This Party Started set in my New Year's Eve post. I showed you one colour from the set and promised to do a post on the full set soon. 

Well, it's been two weeks already and I'll tell you why I didn't get around to this sooner. I needed to make sure I have the entire afternoon free to scrub the glitter off after I've done the swatches. No, I'm kidding, it's not that bad. It only took me about 45 minutes when I did all my nails for NYE! Awesome fun. Okay, okay...pain in the neck removal aside....I do really, really love this set! 

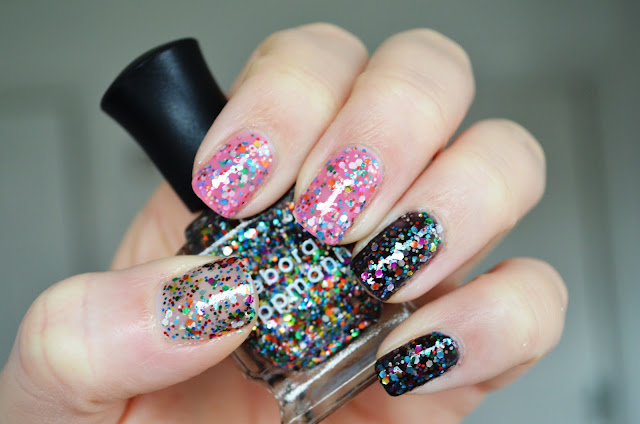
The set includes three full size (15ml) Deborah Lippmann glitter polishes. The glitter is the same in each polish, a rainbow glitter with both large hexagonal pieces and smaller too. Each polish has a different base colour though.
Happy Birthday - Deborah Lippmann
'Happy Birthday' has a clear base and can be worn over any other polish to add some pizazz. This baby is going over a hot pink later today!

Candy Shop
Then there is my favourite, 'Candy Shop' which you can see on my nails in this post. Candy Shop has a soft pink coloured base. It's slightly translucent so you can choose how bold you want the pink to be. One coat gives a subtle pink colour and three coats will give you a solid pink nail.

Forget You
Finally there is 'Forget You', a black base with the amazing multicolored glitter. Again, you'll need two coats for a solid black coverage. This one actually goes on a little uneven, with streaks unless you do use two coats.
I don't usually like to wear a dark nail colour, it's just not me, but this one I'll be making an exception for. I mean, look at all that glitter, it's not exactly dark or dull is it?!

Now, you can call me lazy if you want, but in the end I opted to do just one hand, one time, to show you all the colours. To be honest, I didn't fancy spending my entire Saturday getting glitter everywhere by trying to get it off. So here are the three colours with two coats of each:


I had seen this set on a blog a while ago but I had a hard time tracking it down especially from UK stores. In the end I found it for a little under £26 from Amazon.co.uk. It's also on Amazon.com in the US for just over $40.

In short, I think this set is great. I'm all about a bit of sparkle but I tend to find sparkles or glitter on clothes just comes off looking tacky. Glitter on the nails however, seems like just the right amount, playful but subtle! The glitter is distributed fairly thickly and evenly through the polish and it isn't difficult to apply. One coat is enough but if you layer it you can get an amazing, very shimmery overall effect on your nails.

So what do you think? What other glitter polishes can you ladies recommend? Let me know whilst I spend the next 30 minutes trying to get these off! Haha!

xxx

PS: Does anyone have any useful tips for glitter polish removal?

Paco Rabanne Lady Million and Five Hundred

10 January 2012

I'm a bit of a perfume collector but as yet I've not dared to dedicate a post to any of my favorite scents to wear. The problem is no matter what I tell you, no matter how I try to verbalize the scents, the fact will always remain that you can't smell a blog post. So, with that in mind, I thought it'd be a great idea to try. Excellent logic on my part, no?!

I picked up Lady Million by Paco Rabanne yesterday. I first spied, or should I say, smelt this perfume on my way through Duty Free and regrettably didn't buy it. I would have saved myself a few pounds but having said that it wasn't too badly priced in comparison to some of my usual selections.


The perfume comes packaged in a beautiful gold box embossed with the name. The bottle itself has been inspired by a jewel and the name and atomizer are gilded with gold giving the impression of something luxurious. So that's the packaging described, now onto the smell. You'll have to forgive me here if I can't do this well. To be honest what I'd be inclined to say first is 'it's nice' but I know that doesn't suffice as a description. So here's my best effort...
  
Described as a sensual, seductive and a floral scent, when you first spray it the overall smell is most definitely floral. There's hints of Jasmine amongst the floral bouquet. Unfortunately my sense of smell and knowledge of flowers won't take us any further than that. After a few minutes the scent develops and you definitely can smell the notes of honey and orange. I find the smell to be rather sweet but not in a sickly way. It does, as the description states, seem quite sensual and I find it very smooth. I think it's a versatile scent that can be worn in Winter because of the honey and orange or Spring because of the brightness of the florals. But really that's down to personal opinion and preference though. 

As for staying power, the perfume envelops you nicely for the first few hours and then begins to fade, it can still be smelt if you're up close and personal but by the fourth or fifth hour you need to spritz yourself again to maintain it's strength.


Overall, I love everything about this perfume. The design is sophisticated but compact enough for me to sling it in my handbag easily. The scent is bold without being overpowering and it develops well over the first few hours. I'll be re-buying this again I think.

You can buy Paco Rabanne Lady Million from The Perfume Shop for £59.99 for the 80ml size I have or if you don't need quite so much, £32.99 for the 30ml. It's available from Sephora too, for people in the US and elsewhere, starting from $48.

Five Hundred

Now, enough talk of a million, 500 seems pretty good to me. This week I passed 500 followers! I was so thrilled, I never thought it would happen this quickly. For the first few months I didn't try to attract any readers (since I didn't have anything for them to read) but I remember when I finally passed 50 followers in November and it seemed huge to me. Now I've passed ten times that!!

I want to say thank you to all you lovely people who read my ramblings, comment and of course follow me!
Although I really enjoy blogging, knowing you lovely ladies are somewhere in the world actually paying attention to what I write is not only a strange feeling but is also an awesome, unbeatable feeling and great motivation to keep at it. Your kind words always bring a smile to my face and encourage me to try and make my blog better.

So a BIG thanks! Without you I'd probably have given up a long time ago!


xxx

Color Blocked Nail Tutorial

21 September 2011

Hola Everyone! It's Wednesday, the weekend is in sight and I'm feeling good!

I've finally been sticking to my diet (well 90% of the time I have, that counts as sticking in my book) for the last week and a bit. Prior to that I was being great through the week and then drinking cocktails and eating away hangovers on the weekend! Needless to say that was getting me frustrated because I felt like I was on a diet but the bad weekends were putting a stop to any movement of the scale. I've lost 2lbs this last 10 days though! Yeeey! I'm hoping that's enough to get me going on the right track now. I won't say anymore because I'd rather not count my chickens before they've hatched! Haha!

As I mentioned, in my post about color blocking, I painted my nails with a color block design. Here is how it turned out.

Color blocked nails.

I think it looks cool. It's definately eye-catching, so many people have commented on them. I even got a compliment from a guy about them! When guys are noticing your nails that's really saying something!

I definitely prefer the pink and orange hand to the pink and purple. The purple turned out a bit darker than I'd wanted really. You can obviously choose any colors you'd like.

The best thing is this is very very simple to do, all you need is a few contrasting colors, nail tip guides and a top coat.

What you need to do color block nails.

Super Simple Color Block Nails - 'How To' Guide.

  • Paint your nails with your chosen base color. (For mine I used the pink) You'll probably need two coats.
  • Let that color dry really thoroughly.
  • Apply the nail tip guides to block off sections of your nails. I did mine in random sizes on each nail which makes it a lot easier than trying to make them all look perfectly even.
  • Paint the contrasting color (I chose orange on one hand and purple on the other) on to one section of the nail.
  • Allow that to dry and then remove the tip guides. Don't remove it too early or you won't get a neat line.
  • Paint a top coat over the whole nail to seal the design and finish the look.
Don't you love how simple that is?! It really is such an easy nail design to do, you don't need any real skills for this one. I will be doing it again soon in other color combinations, I'm thinking of doing pale turquoise with hot pink first.

Color block nails - hot pink and orange.

Color blocking with hot pink and purple nail polish.

Right now I'm going out shopping with my friend. We're heading out to check out the Autumn lines. I love dressing for Fall, I think it's when I look best. Cardigans, jackets, layering, pretty scarves! There's just so much to love. I'm going with the intention of not spending much money though because I'm supposed to be saving right now (and I also own an abundance of all the above mentioned items, some of which have barely been worn). Let's see how that goes....

Have a great day!
xxx

Terrible Tuesday and Cath Kidston Flower Nail Art.

30 August 2011

For me today was 'Terrible Tuesday'. I always feel like Tuesdays are the worst. On Monday you have a little energy from the weekend, Wednesday you're always thinking 'I'm half way there now - I can do this', on Thursday you know tomorrow is Friday and on Friday, well...it's Friday. But Tuesdays....Tuesday's are just horrid. I'm not going to bore you with the details though and waste more energy on it. Instead, I'm going to tell you what I've been up to this evening.

Tonight my boyfriend is out so it's just me. I quite like a little alone time - I've read a few of my favourite blogs which always seem to feature (I don't know why I do it?!) skinny, pretty, immaculately dressed girls who appear to have fantastic lives to go with it. Darn them!

When I read these I think several things like, I need to go shopping (again!) next weekend, I really ought to fake tan and I want to whiten my teeth today. So....here I am, sat with the whitening strips on my teeth, in a little while I'm going to apply some fake tan (just enough for the sun kissed look not like Orange Fanta or Cheetos, do not fear!) and I'm writing this. The other parts will have to wait.

During my Internet browsing the other day I found some cute kinda kitsch Cath Kidston wallpapers for your computer, they're free if you want to download one. There are several more to choose from but here are the ones that inspired me...


She's a fairly popular designer in England, when I was about 16 I had a limited edition phone of hers, I loved it so much, until I dropped it down the toilet that was! *cries* Possibly nothing more annoying than when you do that, is there?!

This is how the floral prints inspired me...

Floral, pink flowery nail art - easy, trust me!

It was fairly simple to do. Here's my simple how to guide.
  • Select a base color and apply two coats.
  • After that has dried splodge on a dot of light colored pink, then on top of that add a darker pink. You don't have to wait for them to dry. The number of flowers you should do depends on the size of your nails, for smaller nails I'd suggest less flowers or it may turn into a bit of mish mash mess.
  • Add a tiny highlight of white to the splodges.
  • Use a green polish to create small leaves around the splodges.
  • Wait for all this to dry then add a glossy top coat to finish it. 
And hey presto you're ready to go.
Pink floral nail art inspired by Cath Kidston.
I love to wear florals, they look so pretty and feminine. Occasionally I'll wear a floral dress but the easiest way to wear them is just by adding a hint to brighten up a plain outfit. You don't want people to start thinking of you as a walking garden! I recently picked up two over sized corsages from H&M which are perfect for adding that flirty, floral touch.  I like to attach them to my handbag and wear them on my clothes or jackets. If I'm feeling lazy or in a rush I just tie my hair in a messy bun and plonk one on the side. They make everything look prettier!
Pretty femine and floral in just the right amounts. Corsages - H&M.
My messy hair with a floral corsage from H&M
Leave me a comment to let me know what you think :) Have to go see about that tan now...

..ta ra!

xxx

PS: I've just set up an account on bloglovin'. Please help me out by clicking to follow me :) If you're feeling really really nice you can follow me on twitter too, the links on the left. Thanks ladies! x


Follow Ugly Duckling